I am so happy with this layout. I'm not sure if it's the actual layout or the fact that I'm so proud of my son. This is his boot camp graduation picture. I used the cricut cartridge "Base Camp" for the title. All edged were distressed and inked. The patterned paper is from Graphic 45.
I have only seen him a few time since he graduated from boot camp. After graduation he came home for about 10 days then he was off for additional training in North Carolina. After that he was moved to an airforce base for his MOS. He is now awaiting another transfer to a different MOS. He surprised me this past Saturday with a 3 day visit. I was so excited to see and feel him it was great. Of course, the time flew by. He only had 1 and 1/2 days to visit with me and more importantly all his friends, LOL. I took him back to the airport at 6:30 am on Memorial Day.
It was so nice to see people treat him with such kindness the whole time he was here. The restruant where we took him Saturday night, comped his meal after they found out he was a Marine on leave. Sunday morning he said he wanted donuts for breakfast, when the shop owner overheard us talking about what time he had to report back to base, he asked, what branch he was in AND again, comped our breakfast. When I took him back to the airport for his return flight, everyone who realized he was military, shook his hand and thanked him. It was soooo impressive to see.
Anyway, this layout is my tribute to his courage.
Wednesday, May 27, 2009
The Few... The Proud...
Sunday, March 29, 2009
Ms. Gardener
My co workers threw me a surprise party for my Birthday a couple of weeks ago. I was sooo sick I really couldn't enjoy it like I wanted to. But the sheer fact that they cared enough to surprise me was very touching.
So how to let them know how very much I appreciated their gesture? Why a handmade card does the trick every time.
The Majority of my supplies are CTMH. I used CTMH Cardstock in Vanilla Cream and Cocoa. The teal color is Bazzill. The Stamp Set is Ms. Gardener. I just love this little set. I stamped it with Staz On Brown Ink then tied that bit of Brown and White Dotted Swiss ribbon for the piece de resistance. Outside Sentiment: THANKS
Inside Sentiment: You Brighten My Day
Monday, March 16, 2009
Storage System for Cricut Cartridges

1. I tore out all the "extra" pages in my handbooks, you know the ones... the "ones" most of us can't read, all the "other" languages. By doing this, your books are considerably less bulky and you can fit more in your containers.


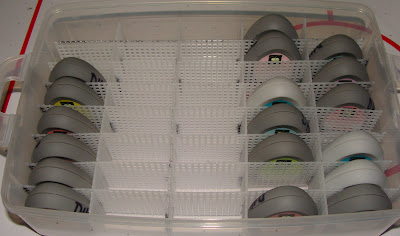
The cutting directions are: I used a black marker to mark my cut lines first then just used an exacto knife to make the cuts.
You will need 7 strips of 59x10 (# of holes) Cut 5 holes deep @ 12, 24, 36, 48
4 strips of 39x10 (#of holes) Cut 6 deep @ 5, 10, 15, 20, 25, 30 & 35 59x10:
You should see 59 rows by 10 rows so you’re cutting at 60 and 11. The same for 39x10.

I'm thrilled with the set up and the cost. Now if I'm designing with DS and just need the carts I can grab one container and I'm ready to go. If I want to cut from the books I can take all the containers to my work station.