Pages

Thursday, December 18, 2008

My latest projects

I have been very busy with Christmas Preparation, so much so that it was been hard to get into the studio and do any type of creating. But I have managed to sneak in a few times and here are the results.


My version of a Christmas Planner.


This was just a little notebook I found at the dollar store. I unassembled it, added the divider pages, covered the front and back with Christmas Paper from CTMH and then embellished. Oh what Fun.

I also created a few cards lately.


I'm off next week for Christmas Break. Hope to really do some creating then.

Saturday, November 8, 2008

A Cristmas Card

I spent this past week, putting the finishing touches on a Christmas Card for Matt. I'm thinking I will send this to him in Boot Camp. Hopefully the DI will not make fun of him for getting a card.

All of the products I used are from Close to My Heart. I used the Merry Pursuits stamps, Grey Flannel and Citrus Leaf Cardstock. The sentiment is from the Wonderful Season Stamp Set and reads: Have Yourself (on the front) and Merry Little Christmas (on the inside) and is stamped in Grey Flannel. I also added a sprinkling of Primsa Glitter for some sparkle.

I just love these little guys. Sooo much fun. You can also see that I took my color combination from the card that I saw posted here. Only thing I still want to do is add the white inking around the edges. I'm still waiting for my ink to come in.


Saturday, November 1, 2008

Anniversary Card

Here is a card I made for my husband for our Anniversary. All items with the exception of Ranger's Distressing Embossing Powder are from Close to My Heart, for which I am a consultant, so if anyone needs anything....


Paper is Close To My Heart's "Sarsaparilla". I inked the edges with CTMH's Autumn Terracotta inks and then dyed the natural twill ribbon with the same ink color. The Stamp is from CTMH's Steep and Deep set. Stamped in CTMH's Chocolate ink, embossed with Ranger's Distressed Embossing Powder then embossed again with CTMH clear EB. The sentiment was hand written using CTMH's chocolate pen.

Monday, October 27, 2008

Let the Crafting Begin....

I love the Holiday season. I also love crafts. Every year I say I am going to do a bunch of crafts for the holiday season but somehow the time slips away. I think this is becuase I face the season unprepared. Well, not this year. I already have a list of things I want to accomplish. I want to do lots of homemade gifts this year. Here is how my list is shaping up:

Homemade tree ornaments
Christmas cards
Homemade Jellies
gift baskets for neighbors
Journals and journal covers
Soaps, salts and more
Gift tags

I am hoping to start my cards tomorrow. I have all the supplies and the stamps, just need to find the time to sit and do them. I also want to start on Mardi Gras table decorations. I have already started a few things for Mardi Gras, purchased the main item for my centerpiece. And it feels so good. I think that being prepared is the key for me this year. Not letting myself being overwhelmed and just enjoying the process as well as the end result. I hope to share a few more items with you between now and Christmas.

Sunday, October 19, 2008

Mini Album Tutorial

Trading Card Star Album
Instructions written by Donna Lanclos


Materials

2 mat or chip boards 3 5/8” X 4 1/2"
2 pieces patterned paper about an inch larger that the boards
2 pieces solid cardstock 3 3/8” X 4 ¼” to complete inside covers
Coordinating ribbon 16” long
Layer 1-7 pieces solid cardstock 3 5/8" X 9"
Layer 2-7 pieces solid cardstock 3 5/8" X 6 1/2"
Layer 3-7 pieces patterned paper 5 1/2" X 7 1/4"
Paper Trimmer
Bone Folder
Adhesive

Directions

To cover the mat/chip board: Take one mat or chip board cut to 3 5/8” x 4 1/2”. Cover the mat/chip boards with patterned paper. Miter the corners and secure with adhesive. Cut the ribbon in half. On the short side of each cover, adhere 2” – 3” of ribbon to the inside of the cover. Make sure that the ribbons are on the open side of the book and not the spine. Adhere the inside cardstock cover panels (3 3/8” X 4 ¼”) over the patterned paper covers.

First Layer (Largest) Cut 7 pieces of cardstock 3 5/8” x 9”. Fold each piece to 3 5/8 x 4 ½. Set these aside.


Second Layer (Middle) Cut 7 pieces of cardstock 3 5/8 x 6 ½. Fold to 3 5/8 x 3 ¼. Set these aside.


Last Layer - Photos are labeled 1-4 above - (smallest) Cut 7 pieces of patterned paper 5 ½ x 7 1/4 1. Fold to 2 ¾ x 7 ¼. 2. Open and fold to 3 5/8 x 5 ½. 3. Open and refold to 2 ¾ x 7 ¼. Cut from the bottom corner up to the fold in the middle on both side. 4. Fold the pointed end up to form the pocket page.

If you did not use double sided patterned paper reserve the two triangles that you cut off, and adhere them to cover the white side when folded. Ink the edges to hide any misalignment.

To Assemble the Book:

Take 1 of the bottom/larger pieces and run adhesive along both of the short ends. Take 1 of the middle pieces and line the left short edge with the left short edge of the bottom piece. Then adhere the right short edge with the rights short edge of the bottom piece. Next, run adhesive along both of the short ends on the top of the middle layer. Take 1 of the top/shortest layers and line the left short edge up with the left short edge of the middle layer and adhere. Then adhere the right edge of the middle layer to the right edge of the top layer. Repeat with remaining 6 pieces.

You now have 7 booklets with 3 layers each. Adhere the back of one booklet to the front of another booklet. Repeat with remaining booklets. Run a line of adhesive one all four edges of the top of the booklet. Adhere the top cover to the booklet. Repeat with the back cover. Make sure your ribbons are facing the open pages of the booklet and not the spine.

Your Star Album is now completed and should look something like this when opened.

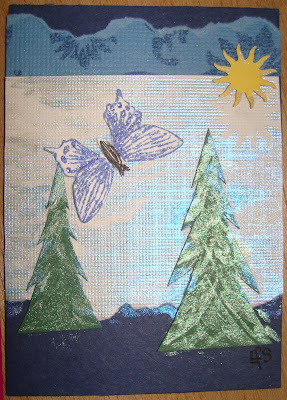
This is a shot of my album filled with ATCs.


Happy Scrappin, Hope you enjoy making one for yourself.


Saturday, October 18, 2008

Sassy Suzi Cards

I have been in a card making frenzy lately but keep forgetting to take pictures of the little buggers. I purchased the cutest set of stamps form Stampin Up over the summer. It is called Sassy Suzie, Retired.

Anyway, I find that this stamp set is soooo versatile for girlfriend cards. Here are a few pictures of some that I have made. If you look back on my blog you will recognize this same coffee drinking girl from a couple of ATC's I made over the summer.

They look a little fuzzy here, sorry bout that. I stamped the word Bonjour on the front of the pink and black card then stamped the sentiment inside.

I love the sayings that come with this set. They sound like something I would say. She has a bit of a sassy mouth. Anyway the saying on both cards is "Your friendship is the most uplifting thing in my life without underwire!" Don't you just love it!! Some of the other sayings are "We are such good friends because surprisingly you're not intimidated by my beauty" along with a very generic "Happy Birthday". Just gotta love it.

Tomorrow I will post a Mardi Gras card I created using the Glimmer Mist Resist Technique. I might even do my first tutorial. Check in tomorrow to find out.

Monday, September 22, 2008

Blog Candy - Check out this blog for some sweet surprises

30 000 HITS BLOG RAK!
It's 30 669 ! Wow! I am so happy that there are scrappers/card-makers out there who enjoy visiting my blog! This is such a confidence booster! I love blogging and I'm glad you all visit me in blogland.Well, let's get to the bloggy scrappy goody that I'm offering you all!The package will include:~some Stampin' Up cardstock~some stamped images on white cardstock~a mixture of ribbon~some buttons~and anything else I can find around my scrappy area!So, what YOU have to do for a chance to win this is to post here in the comments to say HI. If you post the second time with a link to your post where you told others about my blog RAK, then your name will go in twice!The winner will be chosen on OCT 5TH (which, btw, is the day after WORLD CARD DAY!!! Wahoo!) If you participate in my WORLD CARD DAY challenge HERE or on any of my other blogs: Sisterhood of Scrap, Just My Sketches or Christmas Cards All Year 'Round, you will get your name put in for each challenge you do!

Monday, September 1, 2008

Hunkered Down and Waiting

We are all boarded up and all outside items have been secured. My photos and albums have been placed in waterproof containers and placed on top of my entertainment center, so those should be safe from any water. After Hurricane's Katrina and Rita people I spoke with said that the things they couldn't replace like photos was what they mourned the most.

We have hunkered down with plenty of food and water. Now its just a matter of waiting. Hopefully during all that waiting I can play in the scraproom. I got all the supplies I needed to start my Christmas Cards. I think I' going to scraplift this card I saw on Andrea Walford's blog. This lady is very talented.


http://andreawalford.com/ I will post my version after the storm.

Check out my prehurricane pictures on my garden blog - Through the Garden Arbor.

http://gardenarbor.blogspot.com/

See ya after the storm.

Sunday, August 31, 2008

Hurricane Scrapping

With Hurricane Gustav making its way towards our coast, my leg has started to hurt terribly. I am hoping to finish securing our house this morning and will spend the remainder of the day working on Christmas Cards and a couple of thank you and birthday cards. The city is shut down until Wednesday, even the malls and craft stores. Thank goodness I received a large Close to my Heart order last week and will have all the supplies I need to make my cards. I will post pictures as I complete the projects.

Have a great Labor Day Holiday.

Tuesday, July 22, 2008

More ATC's

I have created another set of Artist Trading Cards to swap out. They are going postal this morning. The theme was "something unique about me". I chose a cute little stamp of a sassy girl drinking coffee and added the word "Bonjour". How is this me? I'm a coffee drinker, who lives in south Louisiana (Cajun Country) where our language is filled with a lot of french phrases. I also work at a French Immersion school where French is spoken about 75% of the student's day.


The other one is a one of a kind I made for Julie H who was kind enough to swap Cricut cartridges with me. I love the colors on this one.
The rest are the cards I received in my swap to date. There were eight of us swapping. Won't these little cards look great in my ATC Star Album?

This one is from Shelley P.
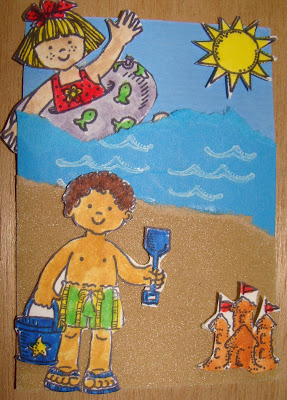

This one is from Debbey T.


This one is from Liz F.


I will post the remaining cards when they all come in.

Happy Scrappin to you!!!


Wednesday, July 9, 2008

Embossing Petaloo Flowers

While working on my buddy page for The Acadiana Cropper's, Cropping in the 60's crop I discovered that you can emboss the foam flowers by Petaloo. I was adding them to my page and the flowers were curling up. I figured if I hit the flowers with my heat gun for a few seconds they would unfold and lay flat. Well I guess I heated one up a bit too much and it started to curl up the other way. I immediately removed the heat and placed my hand on the flower with a bit of pressure to flatten it back out again. When I removed my hand I had my fingerprints embossed into the flower. This made me think I could possibly emboss these little flowers. So I reheated the same flower for about 30 seconds or until it started to curl upwards, placed it in one of the Cuttlebug embossing folders and just pressed down on the folder with my hand and.... voila.... it was embossed. Wanna see the pictures??


Saturday, June 28, 2008

Its Official

I'm a new consultant for Close To My Heart. I took the plunge and signed up. I received my "kit" yesterday evening and will spend the weekend going through it. Hopefully I will have a website by next week. I'm looking forward to learning about the products and then teaching what I love to others.


Otherwise, things on the home front are quiet. I completed a couple of pages in the last few weeks, one for an online contest and another for my husband's book. I will try to post pictures soon.

Have a great weekend and let me know if you need any CTMH products. Check back soon for the web address.


Thursday, June 19, 2008

Make Your Own Shimmer Mist

Found this while surfing around. Its from a lady named Beth. Thanks Beth for the great recipe.


Make Your Own Slimmer Mist.


To make the spray, get a small spray bottle.

Add to it: 1/4 teaspoon Perfect Pearls
1 ounce water
reinker - depends on how intense you want it. About 10 drops is a good place to start.
Shake well and spray on your project.

Of course, how close you are to the project when you spray will determine the amount of coverage and wetness. You do not have to measure the ingredients exactly. A popsicle stick works well too as a spoon/scoop. It is important to use Perfect Pearls and NOT Pearl-Ex. Perfect Pearls has a binding agent in it and it will “stick” to your project. Pearl-Ex will fall off your project after the water dries unless you use the alternate recipe…..

Alternate method:Get a travel size bottle of Hair Spray and add Pearl-Ex and reinker to it. Shake well and you are good to go.

Some combinations to try:

A light yellow re-inker with gold or bronze Perfect Pearls
A green re-inker with gold PP
Burgundy re-inker with gold PP

Hope this helps someone out there....

And thanks again to Beth for sharing the original post....

Friday, June 13, 2008

Results of Cropping in the 60s

I had an absolutely fabulous time at "Croppin in the 60s" last weekend. I had never been to a large mega crop before and loved every minute. I met some wonderful ladies that I can now call friends from Shreveport, New Orleans, Mississippi and East Texas. I was able to get a lot of pages done but now know that I need page kits prepared to get even more done.

Here are a few pages I did....

This page is part of my husband's book. Its a picture of him at the camp in Toledo Bend during the late 80's. I know its hard to see, but I used silver thread for fishing line.


This is another page in his book. Its his first date. The Journaling reads:

Who: Russell and Shirley
What: Russell's First Date
When: April 1964.
Where: Rayne, Louisiana

Funny thing about this layout is he is going on his first date and I'm only 4 years old.


This layout is my favorite, however, Im stuck on what to title it. Its pictures of my husband's hands. I love his hands, so gentle. He is holding hands with the grandbaby and the other he is patting the grandbaby's bottom as he napped.

Someone help me with a title. If your title is chosen, I will send you some scissor jewelry. So, leave me a commend with a title and your email address and I will chose one I like.


You have until next Wednesday, June, 18th to inspire me with a title.


Wednesday, June 4, 2008

My first ATC


Here is my very first ATC. I signed up for an ATC swap and this is what I am turning in. I wanted something that would reflect who I am. The Fleur de lis symbolizes Acadiana, which is where I live. I know its hard to see, but the Fleur de lis is embossed with a glittery embossing powder from Ranger Industries. Its is gold in color but has irredescent flakes of glitter. I first stamped the image with black ink on brown cardstock, then stamped over the image with versamark and embossed. The title was computer generated and printed directly on the cards, I created text boxes in the size I needed then cut them out. I think I got 8 on a page.
I leave for Croppin in the 60's tomorrow. I will try to scan and post all the ACT I receive next week.
Here is a link to Croppin in the 60's
Later.....

Friday, May 30, 2008

Check out my new blog banner

I love my new banner. I hated my old one. It was just plain white, but this really pops. Hope you like the changes also.

Artists Trading Card Star Album


I made this cute little Star Book to hold ATCs.


Next Thrusday I am attending Cropping in the 60's, a 4 day crop about 30 minutes from home. I signed up for an ATC swap.


Every girl needs an album to showcase her swaps, so I threw this little star album together.


If anyone has any questions, please feel free to post it in the comments section.

Tuesday, May 27, 2008

Postcards from the Studio wants some Candy

Check out this link for a chance to win some candy.....

Stamps, Paper, Scissors and Donkey Smiles: 5000 Mark Blog Candy!

Wednesday, April 30, 2008

Mini Album of Firsts

Here is a mini album I made for my niece. Hope you enjoy it.


Front Cover
Inside Cover Poem

Birth stats
First Day Home

First Halloween

First Bath

First Christmas
First Thanksgiving First Easter
First Haircut


First Steps


First Birthday

Inside Back Cover with envie for lock of hair


Back Cover

I also included pages for the following firsts:

Diaper Change

Feeding

Outing/Vacation

Rolled over

Smiled

Tooth

I really enjoyed making this little book. I modge podged the front and back cover to make it a tad more durable.

Missy, my niece, cried when I gave it to her.