Pages

Wednesday, November 18, 2009

My Latest Project, flowers and a class layout

I have not been working in the studio for some time now. I have been busy getting ready for Mardi Gras pictures and visiting with my son who came home on leave for a week. I'm hoping to get back into the swing of things next week. I will have the week off for Thanksgiving break. I can't wait!!!


I have been tinkering with this layout for weeks now and have finally completed it. I love the photos of my family. We were all so young.


What do you think about my rose? I recently stumbled across this wonderful tutorial on how to make your own beautiful roses out of cardstock! This technique is sooooo easy. Please understand that this is not my idea. The only credit I can take is the copy and paste part, LOL. This is a stolen tutorial from the Scrap a Little blog. Enjoy!

To start you will need 18 hearts in 4 different sizes. If you have a Cricut it comes in real handy here. Cut from sturdy card stock: 6 hearts at 2 1/4" 5 at 2" 4 at 1 3/4" and 3 at 1 1/2"


If you don't have a Cricut you could use a Fiskars heart template.

Ink all edges Punch a tiny hole at the bottom of every heart. Take a brad (in the same color) and turn it upside down and start stacking all the hearts from smallest to largest

Now the magic starts: take petal by petal and scrunch them up and around towards the middle. Don't be gentle here; the more manhandling the better!
Last step is to spray the rose with glimmer mist. I have tried this with smaller sized hearts also.


Lastly, I want to share with you a fun layout below that I recently completed as part of a calendar class which is offered by Treasured Memories, my local scrapbook store, The class was taught by Wendy R, a very talented friend of mine. Every class she teaches she makes sure to include several new techniques like the fence on this one.


Well like I said things have been slow in the studio, hope to post more later.


Thursday, October 15, 2009

Projects from the Studio

Its been a while, but life has gotten fairly hectic around here. We have been doing a very simple remodel in our guest bathroom. Well what I thought was simple, just slap some paint on the walls, change a light and some towel bars, add some crown molding and such. Well, its taken every weekend for a month now. Oh well, the outcome will be all I was hoping for.


I did sneak in some time to finish a few projects in between the bathroom redo. Here are some pictures


A shadow box I made for my father for Father's Day. Its based on the two page layout I did for myself earlier this year. The photo is of my father's parents.

A Father's Day present for Russell. The photo has no backing, so the wall color shows through and adds to the overall appearance of the layout.

Pictures of my grandmother, Germaine, at various stages of her life. My Great-Grandfather Alexandre Hebert is pictured in the first photo.

Sunday, September 20, 2009

Birthday Banner

I can't believe, I forgot to post a picture of my banner. I made this banner for my grandson's birthday party using the Cricut Paper Dolls Cartridge. I posted a picture of the banner on the circut message boards and was featured in the Cricut Chirp and on their website. I couldn't believe it when I got the April Chirp and there was a link to my post. Here is a picture of the banner.


I had a good time making it and my grandson must have enjoyed it also, because at the party he kept telling his guests "See my cake, and my presents and look what Nana did" LOL. He was just too cute. Two points for Nana!!

Saturday, September 12, 2009

Weekend Crop

I attended a weekend crop at the Ladybuy Lodge here in town recently. I had such a wonderful time. I didn't know any of the ladies that I was sharing a space with, but I have to tell you they were so much fun. I knew a few of the other ladies but didn't get to sit with them. The Carols from Shreveport were there, Mel Morris and the Treasured Memories ladies were all there. What a creative weekend.
Here are some pictures one of the layouts I did that weekend. I really like the way this one turned out. I used glimmer mist to create my own background paper, made the border with bridal tulle and used my cricut to cut out all the pumpkins and sunflowers then pieced them together and used water coloring to give everything dimension. Some of the sunflowers and pumpkins were popped up to also add dimension.

Paula will be hosting another one in November and I'm already signed up for that one. Can't wait!!!

100 Cricut Cartridges

Wow, Cricut has already created 100 cartridges. Now in celebration of their 100th, the company is giving away 100 cartridges. Be sure to go to their website and check out all the products.

http://www.cricut.com/shopping/ProductDetails.aspx?id=361&s=1&sc=2

Saturday, July 4, 2009

Happy Birthday America


Happy Fourth of July America!!
Hope everyone has a safe and happy fourth!!


Vintage Layout

I am so in love with the vintage look. I'm not sure if its because I have all those old photos that need scrapping or its just the look itself. On a recent trip to San Angelo, Texas to visit my son, who was stationed there, we went into town to do some shopping. I ventured into a store called J. Wilde's Boutique. The sold items from the 50s, 60s and 70s. It was like walking into my grandparent's house or even my house as a little girl. I saw suitcases I had, canisters like my grandmother had and furniture everyone had. In the back of the store there was a section on decorator fabric and trims from the same periods. I found the most adorable ribbon, it was green and fluffy with fabric roses. I just had to have some, but at $8 a yard, I couldn't get crazy. I also found some beautiful black trim with tassels. Love it. So, you want to see the layouts I did with the vintage ribbon and trim?


Journaling reads "Pearl and LJ Hebert, Married in October of 1932" My Dad couldn't remember the exact date, and this isn't their wedding picture. No one knows when this photo was taken so I just figured I would put their names and the year of the marriage because its when their love story began. For this layout I used bazzill cardstock, Patterned Paper by Creative Imaginations (Christine Adolph), that vintage green lace with 3D flowers incorporated into it, vintage cotton lace (purchased at a garage sale for 25 cents had almost three yards), feathers, a stick pin, jeweled brads, buttons, Prima butterfly, and a shabby chic bird I purchased at a crop. The title is something I found in the sewing department at Hobby Lobby. It think it says it all.

Uh Oh, I forgot to take a picture of the other layout. Everything is done except the title. I will take the picture this weekend and upload it on Monday.


Wednesday, May 27, 2009

The Few... The Proud...

I am so happy with this layout. I'm not sure if it's the actual layout or the fact that I'm so proud of my son. This is his boot camp graduation picture. I used the cricut cartridge "Base Camp" for the title. All edged were distressed and inked. The patterned paper is from Graphic 45.

I have only seen him a few time since he graduated from boot camp. After graduation he came home for about 10 days then he was off for additional training in North Carolina. After that he was moved to an airforce base for his MOS. He is now awaiting another transfer to a different MOS. He surprised me this past Saturday with a 3 day visit. I was so excited to see and feel him it was great. Of course, the time flew by. He only had 1 and 1/2 days to visit with me and more importantly all his friends, LOL. I took him back to the airport at 6:30 am on Memorial Day.

It was so nice to see people treat him with such kindness the whole time he was here. The restruant where we took him Saturday night, comped his meal after they found out he was a Marine on leave. Sunday morning he said he wanted donuts for breakfast, when the shop owner overheard us talking about what time he had to report back to base, he asked, what branch he was in AND again, comped our breakfast. When I took him back to the airport for his return flight, everyone who realized he was military, shook his hand and thanked him. It was soooo impressive to see.

Anyway, this layout is my tribute to his courage.

Sunday, March 29, 2009

Ms. Gardener

My co workers threw me a surprise party for my Birthday a couple of weeks ago. I was sooo sick I really couldn't enjoy it like I wanted to. But the sheer fact that they cared enough to surprise me was very touching.

So how to let them know how very much I appreciated their gesture? Why a handmade card does the trick every time.

The Majority of my supplies are CTMH. I used CTMH Cardstock in Vanilla Cream and Cocoa. The teal color is Bazzill. The Stamp Set is Ms. Gardener. I just love this little set. I stamped it with Staz On Brown Ink then tied that bit of Brown and White Dotted Swiss ribbon for the piece de resistance.

Outside Sentiment: THANKS
Inside Sentiment: You Brighten My Day

Monday, March 16, 2009

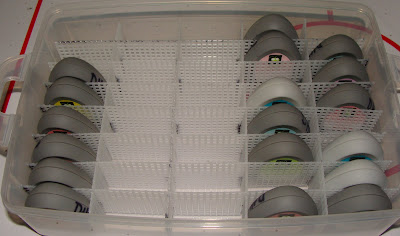
Storage System for Cricut Cartridges


I have seen numerous systems for storing all those cricut cartridges floating around on the web and I finally decided that I needed to make one for myself. There's been a post that I saved I believe from the cricut message board using the snapware containers to store your cricut carts and handbooks in. I found my storage containers at Lowes after Christmas on sale 75% off so I bought two. Glad I did now.
I'll explain step by step what I did starting with my handbooks.

1. I tore out all the "extra" pages in my handbooks, you know the ones... the "ones" most of us can't read, all the "other" languages. By doing this, your books are considerably less bulky and you can fit more in your containers.


2. I used Fabulous Finds and George to make dividers the right size to go between each handbook and overlay. I used a lable maker for the titles. I glued my labels on each divider then used my Crop a Dile to punch holes for two eyelets. I didn't want to chance losing any labels. I also like the way it give it that old library cart catalog feel. Then I color coded my shapes, solutions carts with green and the fonts with gold.

3. I used the plastic canvas from Walmart. Got six sheets for less than 2 bucks to make the divider for the cartridges. I found those instructions somewhere online. Sorry I was bad and didn't save the credit info. But whoever you are I loved your idea the best.

The cutting directions are: I used a black marker to mark my cut lines first then just used an exacto knife to make the cuts.

You will need 7 strips of 59x10 (# of holes) Cut 5 holes deep @ 12, 24, 36, 48

4 strips of 39x10 (#of holes) Cut 6 deep @ 5, 10, 15, 20, 25, 30 & 35 59x10:

You should see 59 rows by 10 rows so you’re cutting at 60 and 11. The same for 39x10.


I'm thrilled with the set up and the cost. Now if I'm designing with DS and just need the carts I can grab one container and I'm ready to go. If I want to cut from the books I can take all the containers to my work station.
And there you have it. My cricut storage system. The one that worked the best for me. I know there are others out there, but this is what I found that worked the best. Very sturdy.

Have an awesome day!


Monday, February 23, 2009

Designer's Eye Class

My local scrapbook class offers this wonderful class once a year. It is taught by a very talented lady, C. Girard. This is one of her creations with my twist on it. It was so much fun to create. I have already signed up for the next portion of the class. In the class, which is two parts, you get to create the layout of your choice from the first 5 of 10 that she created, but you get the booklet with the other layouts as part of your supplies. Then the next month you can create a layout from the second set of 5. You learn so many of the latest techniques. Hope you enjoy.

This is a white on white layout. Its hard to see but the entire layout is lined with chipboard letters (painted white) with the phrase "Let it Snow" running from left to right. Some of the letters are heat embossed with silver and some are glittered using stickles star dust. The photos were distressed with sandpaper and the tiny files and the photo mats were torn. We also added several chipboard snowflakes that were painted white and then had an application of crystal effects added. See the dangling crystal from the snowflake on the right hand page?


BLOG CANDY ALERT

Hey gang, check out the link below. This sweet soul is giving a way a Score Pal!!. Cruise on over and check out her blog. It sure is inspirational.

http://papertherapy-wendy.blogspot.com/2009/02/my-first-blog-candy-giveaway.html

Tuesday, January 27, 2009

Recent Projects

Life has been really hectic around here. You would think that now that Matt is living away from home and Jake is on his own, I would have all the time in the world to indulge in my paper crafts. But alas, I do not. I work a full time job and during the week after work I'm just too tired. On Saturdays I watch my grandson and on Sundays, I split my time between working in the garden, creating in the sun room, doing laundry and housework.

But I did find some time recently to do a little creating. Here are pictures of some recent projects. Hope you enjoy them.
I entered above layout in a sketch contest and came in second. Not bad for my first layout contest.
The Religious Milestones layout was completed in 2007 as part of an album for my husband.
Wanted was also completed in 2007 and added to my husband's album.

The layout below was done using the Paper Dolls Cartridge only. The initial idea came from a class at a lss. I purchased one of the left over kits and completed it at home with, of course, a few changes. I, like most people can not copy a layout completely. You know we always have to change something, LOL...


This is a little book I created for my Dad. He loved it and displays it on the coffee table for all to see.


Wow, looking back at some of those pictures is a bit scary, especially the last one that says 48. All I can say is "Who ME??"